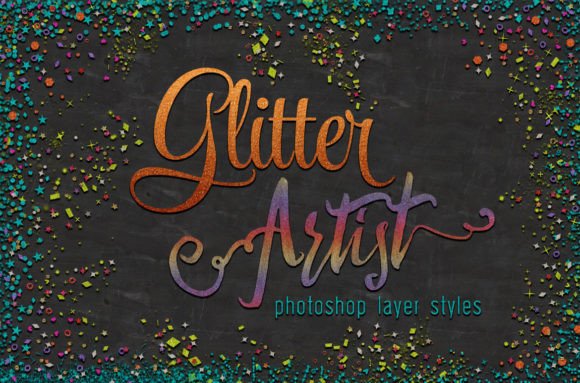
Glitter Artist Layer Styles Guide
Visual impact is often the deciding factor in whether a digital design captures attention or fades into the background. For graphic designers, social media managers, and creative entrepreneurs, adding texture and shine can transform a flat composition into something dynamic and engaging. Glitter Artist Layer Styles offers a specialized toolkit designed to streamline this process within Adobe Photoshop. Rather than manually painting every speck of light or searching for high-resolution stock images that may not fit your specific color palette, this resource provides a flexible system for generating realistic glitter effects directly within your workflow.
The core value of this toolset lies in its versatility. It is not merely a collection of static overlays but a comprehensive suite of Photoshop Layer Styles and brushes that allow for endless customization. Whether you are designing event invitations, crafting social media graphics, or enhancing product mockups, understanding how to leverage these assets can significantly reduce production time while elevating the perceived quality of your work.
Understanding the Dual-Style System
One of the most practical aspects of Glitter Artist is its organized approach to different design needs. The package includes two distinct sets of layer styles, each optimized for specific applications. Recognizing which set to use is key to achieving professional results without unnecessary trial and error.
The first set, contained in hg-glitterartist-styles.asl, is engineered for versatility. It is ideal for creating individual pieces of glitter, scattered effects, and can be applied to thin-to-medium weight fonts. This flexibility makes it particularly useful for designers who need to add subtle sparkle to intricate details or smaller text elements where heavy textures might obscure readability. Because these styles are built as layer effects, they remain non-destructive. You can adjust the scale, opacity, and blending modes at any time, allowing you to fine-tune the intensity of the glitter to match the lighting and mood of your overall composition.
The second set, hg-glitterartist-textstyles.asl, is optimized for larger surfaces. These styles are best suited for bold typography, headlines, and large geometric shapes. When working with big blocks of text or prominent design elements, you need a glitter effect that has enough density and variation to look convincing at a larger scale. Using the standard styles on large areas can sometimes result in a repetitive or sparse appearance, whereas the text-specific styles provide the necessary coverage and depth. This distinction saves designers from having to manually duplicate and scatter elements to fill space, offering a more efficient path to a polished look.
Expanding Creativity with Dynamic Brushes
While layer styles are powerful for applying effects to existing shapes and text, true creative control often requires the ability to paint freely. This is where the included brush collection, hg-glitterartist-brushes.abr, becomes an essential asset. This set includes both standard and dynamic Photoshop brushes that enable you to draw out your own glittery tinsel, create custom scatter patterns, or place individual glitter pieces with precision.
Dynamic brushes are particularly valuable for creating organic, natural-looking distributions. Unlike static stamps, dynamic brushes can respond to pressure sensitivity (if using a tablet) or randomize size and rotation, preventing the "cookie-cutter" look that often plagues digital embellishments. For example, if you are designing a festive border for a holiday card, you can use these brushes to hand-draw a trail of sparkling dust that varies in density and direction. This level of control allows for a bespoke aesthetic that pre-made frames or clipart simply cannot replicate.
Additionally, the inclusion of pre-made glitter frames and scatter elements provides a quick starting point for those under tight deadlines. You can drop these elements into your canvas and then use the layer styles to recolor them instantly, ensuring they align with your brand guidelines or project theme. This hybrid approach—combining ready-made assets with customizable tools—supports both speed and creativity.
Practical Applications for Professionals
The utility of Glitter Artist Layer Styles extends across various professional domains. For marketers and bloggers, eye-catching visuals are crucial for click-through rates on social platforms. A well-executed glitter effect on a sale announcement or a celebratory post can stop users from scrolling past. However, the key is subtlety. Overused or poorly rendered glitter can appear cheap. By using the dedicated text styles for headlines and the finer brushes for accents, creators can maintain a premium feel while still leveraging the attention-grabbing nature of sparkle.
Educators and publishers creating digital materials can also benefit from these tools. Adding visual interest to worksheets, certificates, or presentation slides can enhance engagement, particularly for younger audiences. The ability to quickly apply consistent glitter effects across multiple pages ensures a cohesive look without requiring advanced illustration skills. Similarly, small business owners selling handmade goods online can use these styles to enhance product photos, adding a touch of glamour to jewelry or craft listings without needing a professional photo shoot.
Important Considerations for Users
While Glitter Artist is a robust tool, it is important to approach it with the right expectations and technical knowledge. The package does not include step-by-step instructions on how to install or use Photoshop styles and brushes. Therefore, users should already be familiar with the basics of managing assets in Adobe Photoshop. If you are new to loading .asl or .abr files, you will need to consult external resources or Adobe’s official documentation before purchasing. The creator has included some helpful tips, but these are supplementary rather than instructional.
Furthermore, the effectiveness of these styles depends heavily on the underlying layers. Glitter effects rely on contrast and transparency to look realistic. Applying them to flat, solid colors may yield different results than applying them to textured backgrounds or gradients. Experimentation is necessary to understand how blending modes like Overlay, Screen, or Soft Light interact with your specific design elements. Users should also consider the resolution of their final output; while vector-based text scales infinitely, raster-based brush strokes may lose clarity if enlarged excessively beyond their intended size.
Maximizing Value in Your Workflow
To get the most out of Glitter Artist Layer Styles, integrate it into your template library. Create a few master files with common glitter combinations saved as smart objects. This allows you to reuse successful effects across multiple projects, ensuring brand consistency and saving time. For instance, if you frequently create event flyers, save a version with the text styles applied to a bold font and another with the scatter styles used for background accents. When a new project arises, you can simply swap out the text and colors, knowing the glitter effect will adapt seamlessly.
In conclusion, this toolkit offers a practical solution for adding high-quality sparkle to digital designs. By separating styles for fine details and large shapes, and complementing them with versatile brushes, it addresses the common pain points of digital embellishment. For those who already possess basic Photoshop proficiency, it serves as a time-saving asset that enhances creative possibilities without compromising on professional standards.